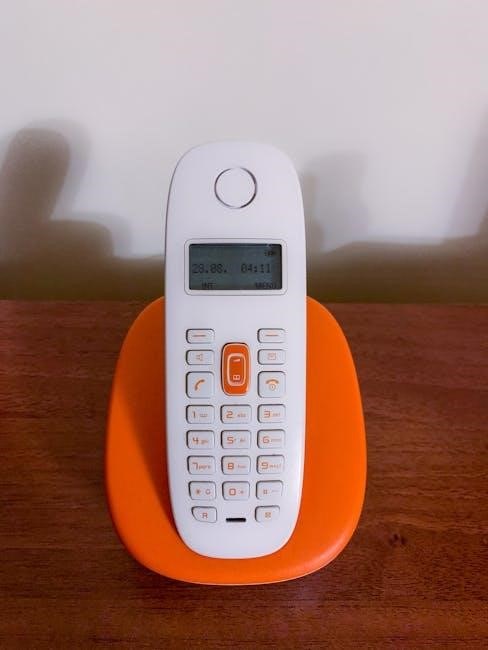
United Kingdom

rangemaster classic 90 user manual

Welcome to the Rangemaster Classic 90 User Manual. This guide provides essential information to understand and operate your cooker safely and efficiently, ensuring optimal performance.

1.1 Overview of the Rangemaster Classic 90 Dual Fuel Range Cooker

The Rangemaster Classic 90 Dual Fuel Range Cooker is a premium appliance designed for versatile cooking. It combines a spacious gas hob with a large electric oven, offering professional-grade performance. Built with high-quality materials, it features a timeless design and user-friendly controls. This cooker is ideal for home cooks and professionals alike, providing ample space for simultaneous cooking tasks. Its dual fuel capability ensures precise temperature control, making it a standout choice for modern kitchens.

1.2 Importance of Reading the User Manual

Reading the Rangemaster Classic 90 User Manual is crucial for safe and effective operation. It provides essential instructions for installation, usage, and maintenance, ensuring optimal performance. The manual highlights safety precautions, warranty details, and troubleshooting tips, helping users avoid potential issues. By understanding the cooker’s features and guidelines, users can maximize efficiency and longevity. Familiarizing yourself with the manual ensures a seamless cooking experience and compliance with manufacturer recommendations.

Key Features and Specifications of the Rangemaster Classic 90

The Rangemaster Classic 90 features a dual fuel system, five-burner gas hob, and large capacity ovens. Its sleek design and advanced cooking capabilities make it a versatile kitchen essential.

2.1 Design and Build Quality

The Rangemaster Classic 90 boasts a robust construction with premium materials and a sleek, timeless design. Its durable finish ensures long-lasting performance, while its modern aesthetics enhance any kitchen. The cooker’s overall height ranges from 905 mm to 930 mm, with a width of 900 mm and depth of 608 mm, excluding handles. Built to withstand heavy use, it features sturdy components and a sophisticated appearance, making it a reliable and stylish addition to your culinary space.

2.2 Cooking Features and Capabilities

The Rangemaster Classic 90 offers versatile cooking options with its dual fuel system, combining a gas hob for precise control with electric ovens for consistent results. It features multiple burner sizes and a spacious oven cavity, ideal for large families or entertaining. Advanced cooking functions and even heat distribution ensure perfect cooking outcomes. The cooker also includes features like a glide-out grill and storage drawers, enhancing convenience and efficiency in the kitchen.

2.3 Dimensions and Installation Requirements

The Rangemaster Classic 90 measures 900 mm in width, with an overall height of 905-930 mm and a depth of 608 mm (excluding handles) or 670 mm (including handles). Ensure the installation area is clear and level for safe operation. Proper positioning and levelling are crucial to prevent damage and ensure optimal performance. Refer to the manual for detailed installation guidelines to guarantee a secure and efficient setup in your kitchen.

Safety Precautions and Installation Instructions

Ensure the area around the cooker is clear and well-ventilated. Avoid placing flammable materials nearby. Always supervise children during operation. Follow the manual’s installation steps carefully.

3.1 General Safety Guidelines

Always follow safety guidelines to ensure safe operation of your Rangemaster Classic 90. Keep the cooking area clear of flammable materials and avoid loose clothing near open flames. Ensure proper ventilation by opening windows or using an extractor fan, especially when multiple burners are in use. Supervise children and pets while cooking. Never leave the cooker unattended during operation. Adhere to these precautions to maintain a safe and efficient cooking environment.

3.2 Step-by-Step Installation Process

Ensure the area is clear of obstructions before installation. Carefully unpack and inspect the cooker for damage. Position the Rangemaster Classic 90 in its designated space, ensuring it is level. Secure the cooker to prevent movement. Connect gas and electrical supplies according to the manual’s specifications. Test all connections to ensure safety and functionality. Finally, check that the cooker is properly ventilated and ready for use. Always follow the manufacturer’s guidelines for a safe and correct installation process.

Operating the Rangemaster Classic 90

Understand the control panel to manage oven and hob functions effectively. Follow guidelines for safe and efficient cooking, ensuring optimal performance from your Rangemaster Classic 90 cooker.

4.1 Understanding the Control Panel

The Rangemaster Classic 90’s control panel is designed for intuitive operation. It features clear markings for dual fuel functions, ignition controls, and safety features. Familiarize yourself with the layout to manage oven temperatures, hob burners, and additional settings. The panel includes indicators for active burners and timers, ensuring precise control during cooking. Refer to the manual for detailed diagrams and explanations to optimize your cooking experience.

4.2 Using the Oven and Hob

To use the oven and hob effectively, ensure the cooker is preheated to the desired temperature before cooking. The hob burners should be clear of obstructions for proper flame distribution. Always use oven gloves when handling hot dishes and avoid leaving cooking unattended. For the hob, select the right burner size for your cookware to optimize heat efficiency. Refer to the manual for specific guidelines on cooking times and temperatures to achieve the best results safely and efficiently.

Maintenance and Troubleshooting

Regular cleaning and care are essential to maintain the cooker’s performance. Address common issues like error codes and burner malfunction promptly to prevent damage and ensure longevity and reliability effectively.

5.1 Cleaning and Care Tips

Regular cleaning is crucial to maintain the cooker’s performance and appearance. Use a damp cloth to wipe down surfaces after each use, avoiding abrasive cleaners. For tougher stains, mix baking soda and water to create a gentle paste. Clean burners and drip trays regularly to prevent grease buildup. Avoid using harsh chemicals on the exterior, as they may damage the finish. Always refer to the manual for specific cleaning recommendations tailored to your Rangemaster Classic 90 model. Proper care ensures longevity and optimal functionality.

5.2 Common Issues and Solutions

If the oven fails to heat, check the power supply and ensure the circuit breaker isn’t tripped. For burners not igniting, clean the igniter and ensure gas supply is on. If error codes appear, refer to the troubleshooting guide in the manual. Regularly cleaning the cooker and checking for blockages can prevent many issues. For persistent problems, contact Rangemaster customer support for professional assistance. Always follow safety guidelines when addressing appliance issues to avoid further complications.

Accessories and Optional Features

Explore compatible accessories like griddle plates, wok burners, and rotisserie kits to enhance your cooking experience with the Rangemaster Classic 90 Dual Fuel cooker.

6.1 Compatible Accessories for the Rangemaster Classic 90

The Rangemaster Classic 90 supports various accessories to enhance your cooking experience. These include griddle plates, wok burners, and rotisserie kits, designed to maximize versatility. Additional items like a grill rack and pizza stone are also available, enabling diverse cooking methods. For optimal performance, ensure all accessories are Rangemaster-approved and installed according to the manual. These add-ons allow you to explore a wide range of culinary possibilities, making your cooker a central hub for creative cooking.

Environmental Considerations

The Rangemaster Classic 90 is designed with eco-friendly features, including energy-efficient burners and an A-rated oven, to minimize environmental impact while maintaining superior cooking performance.

7.1 Energy Efficiency and Eco-Friendly Features

The Rangemaster Classic 90 incorporates energy-efficient technologies, such as A-rated ovens and eco-friendly burners, designed to reduce energy consumption while maintaining exceptional cooking performance. These features not only minimize environmental impact but also align with modern sustainability standards, ensuring your cooking experience is both efficient and eco-conscious.

Warranty and Customer Support

The Rangemaster Classic 90 is backed by a comprehensive warranty. For inquiries, contact Rangemaster’s customer service team via phone or their official website.

8.1 Warranty Terms and Conditions

The Rangemaster Classic 90 is covered by a comprehensive warranty, ensuring protection against defects in materials and workmanship. The warranty period varies depending on the product and its components, with specific terms outlined in the official manual. Proper registration and adherence to maintenance guidelines are required to maintain warranty validity. For detailed information, refer to the warranty section in the manual or contact Rangemaster’s customer support team.

8.2 Contacting Rangemaster Customer Service

For any inquiries or assistance, Rangemaster provides dedicated customer support. You can contact them via phone at 8 (800) 707-68-20 or through email at info@premium-optics.ru. Additionally, their office in Moscow is located at ул. Профсоюзная. For more details, refer to the official manual or visit their website. This ensures you receive prompt and reliable support for your Rangemaster Classic 90 Dual Fuel range cooker.

Appendices

This section provides supplementary materials, including Technical Data and a Troubleshooting Guide, to assist with maintenance, repairs, and understanding specifications of the Rangemaster Classic 90 cooker.

9.1 Technical Data and Specifications

The Rangemaster Classic 90 Dual Fuel cooker features a robust design with dimensions of 900mm width, 608mm depth, and an overall height range of 905-930mm. It includes a dual fuel system, combining a gas hob with electric ovens for versatile cooking. The cooker is equipped with five burner zones, a 65-liter main oven, and a 35-liter secondary oven. Constructed with durable materials, it ensures long-lasting performance. For detailed technical specifications, refer to the official manual or manufacturer’s guidelines.

9.2 Troubleshooting Guide

Common issues with the Rangemaster Classic 90 include ignition problems, uneven heating, or error codes. Check connections and ensure proper gas flow for ignition issues. Clean burners and vents for optimal performance. For error codes, refer to the manual for specific solutions. If problems persist, contact Rangemaster customer support or a certified technician; Regular maintenance, like cleaning filters and checking seals, can prevent many issues. Always follow safety guidelines when troubleshooting to ensure your safety and the cooker’s longevity.

PDF

iliotibial band syndrome stretches pdf

ITBS is a common overuse injury causing outer knee pain, especially in runners and cyclists, due to the IT band’s friction over the thigh bone or knee.

1.1 Definition and Overview

Iliotibial Band Syndrome (ITBS) is a common overuse injury characterized by inflammation of the iliotibial band, a fibrous tendon running from the hip to the knee. It typically causes pain on the outer side of the knee, especially during activities like running or cycling. ITBS occurs when the IT band rubs against the thigh bone or knee, leading to irritation and discomfort. It is frequently seen in athletes and individuals with repetitive knee flexion.

1.2 Common Causes and Risk Factors

ITBS often arises from repetitive knee movements, such as running or cycling, which cause friction between the IT band and the thigh bone. Risk factors include tight or weak hip muscles, poor training techniques, and inadequate footwear. Overtraining and sudden increases in activity levels can also contribute to ITBS, making it prevalent among athletes and individuals with active lifestyles. Addressing these factors is key to prevention and recovery.

Understanding the Iliotibial Band

The IT band is a tough, fibrous tendon stretching from the hip to the knee, providing stability and support during movement. Its tightness can cause friction and pain.

2.1 Anatomy of the IT Band

The IT band, or iliotibial band, is a sturdy, fibrous tendon that runs along the outer thigh from the ilium (hip bone) to the tibia (shinbone). It originates from the tensor fasciae latae and gluteus maximus muscles, functioning as a critical stabilizer during movements like walking and running. Its structure allows it to absorb and store energy, aiding in efficient locomotion. However, its tightness or irritation can lead to discomfort.

2.2 Function and Role in Movement

The IT band plays a crucial role in stabilizing the knee during activities like running, cycling, and walking. It helps in controlling leg movements and reducing stress on the knee joint. By aiding in hip abduction and extension, it enhances movement efficiency. Its ability to store and release energy makes it vital for repetitive motions, though tightness or inflammation can disrupt its function and lead to discomfort during physical activity.

Symptoms of ITBS

ITBS typically causes pain on the outer side of the knee, especially during activities like running or cycling. Pain may worsen with repetitive movements.

3.1 Identifying Pain Locations

ITBS primarily affects the outer aspect of the knee, with pain often radiating along the iliotibial band from the hip to the knee. The discomfort is typically sharp and localized, particularly over the lateral femoral condyle. Tenderness is usually noticeable when pressing on the outer knee area. Pain may intensify during activities like running or cycling but often subsides with rest. Accurate identification of these pain locations is crucial for proper diagnosis and treatment.

3.2 How Symptoms Progress Over Time

Symptoms of ITBS often begin as a mild ache on the outer knee that worsens with repetitive activities like running or cycling. Over time, pain may become sharp and persistent, especially during movements like climbing stairs or squatting. If left untreated, inflammation can develop, leading to swelling and limited mobility. In chronic cases, pain may radiate along the entire IT band, from hip to knee, significantly impacting daily activities and athletic performance. Early intervention is crucial to prevent progression.

Diagnosis of ITBS

Diagnosis involves a physical exam to identify tenderness along the IT band, typically near the outer knee. Providers assess pain during specific movements and palpation.

4.1 Physical Examination Techniques

Physical exams for ITBS focus on identifying tenderness along the IT band. Providers often use palpation to check for pain on the outer knee and thigh. Patients may experience discomfort during specific movements like flexion or extension. Compression tests, such as the Noble test, can also be administered to assess IT band tightness and irritation. These techniques help confirm the diagnosis accurately.

4.2 Distinguishing ITBS from Other Knee Injuries

ITBS is often confused with other knee injuries like meniscal tears or ligament sprains. Unlike these, ITBS typically presents with localized pain on the outer knee without swelling or instability. Providers differentiate ITBS by assessing pain during palpation of the IT band and specific movements, rather than structural damage. This distinction is crucial for appropriate treatment and management strategies.

Stretching Exercises for ITBS Relief

Stretching the IT band and connected muscles can alleviate symptoms. Techniques include crossing legs, leaning away, and standing stretches to target the outer thigh and hip.

5.1 Standing IT Band Stretches

Standing IT band stretches are effective for relieving tension. Start by crossing your legs, with the affected leg behind. Lean gently away from the affected side until a stretch is felt on the outer thigh. Hold for 20-30 seconds and repeat 2-3 times. Keep the back straight and hips aligned to maintain proper form. This stretch targets the IT band and connected hip muscles, providing quick relief from tightness. Modify as needed for comfort.

5.2 Seated IT Band Stretches

Seated IT band stretches are ideal for targeting the outer thigh muscles. Sit on the floor with your affected leg crossed over your other thigh. Place your hand on the knee of the crossed leg and gently press it toward your opposite shoulder until a stretch is felt on the outer thigh. Hold for 20-30 seconds and repeat 2-3 times. Keep your back straight and hips aligned to maintain proper form. Adjust the pressure as needed for comfort. This stretch helps relieve tightness and improve flexibility in the IT band.

5.3 Dynamic Stretching for the IT Band

Dynamic stretches involve controlled movements to enhance flexibility and reduce stiffness. For the IT band, side lunges are effective. Stand with your feet wide apart, then bend one knee and extend the other, keeping your back straight. Shift your weight side-to-side, focusing on the outer thigh stretch. Perform 10-15 repetitions on each leg. This active stretch improves range of motion and warms up the IT band before exercise or sports.

Strengthening Exercises to Prevent ITBS

Strengthening the core, hips, and legs helps stabilize the knee, reducing IT band strain. Focus on exercises like squats, lunges, and leg presses to build muscle support.

6.1 Core and Hip Strengthening Exercises

Strengthening the core and hips is crucial for stabilizing the pelvis and reducing IT band strain. Exercises like planks, bird dogs, and side-lying leg lifts target these areas. Weakness in the hips can lead to poor running or cycling mechanics, increasing the risk of ITBS. Incorporating these exercises into a daily routine helps improve muscle balance and overall lower limb alignment, preventing overuse injuries. Consistency is key for long-term benefits.

6.2 Strengthening the Quadriceps and Hamstrings

Strengthening the quadriceps and hamstrings is essential for improving knee stability and reducing IT band tension. Exercises like squats, lunges, and leg presses target these muscles. Weak quadriceps can lead to poor tracking of the patella, increasing friction on the IT band. Hamstring exercises, such as deadlifts and leg curls, help balance the muscle groups, promoting proper movement patterns and reducing the risk of ITBS recurrence. Consistent strength training is vital for long-term relief.

Foam Rolling and Self-Myofascial Release

Foam rolling is a effective technique for reducing muscle tension and improving circulation. It helps release tightness in the IT band, promoting recovery and flexibility.

7.1 Techniques for Foam Rolling the IT Band

To foam roll the IT band, start by standing near a wall for balance. Cross the unaffected leg over the affected one, keeping the affected leg behind. Lean toward the wall, applying gentle pressure to the outer thigh. Slowly roll up and down, focusing on tender areas. Use a foam roller or similar tool to release tension. This technique helps reduce inflammation and improve circulation, promoting recovery. Regular practice can alleviate IT band tightness effectively.

7.2 Incorporating Foam Rolling into Daily Routines

Incorporate foam rolling into your daily routine by dedicating 5-10 minutes before and after workouts. Start with gentle pressure, gradually increasing as needed. Focus on the IT band, rolling from the hip to the knee. Consistency is key to maintaining flexibility and preventing tightness. For optimal results, combine foam rolling with stretching exercises. Regular practice enhances recovery and reduces the risk of ITBS recurrence.

Advanced Stretching Techniques

Advanced stretching techniques focus on enhancing flexibility and addressing specific tightness in the IT band, particularly beneficial for runners and cyclists with persistent ITBS symptoms.

8.1 Using Props for Deeper Stretches

Props like foam rollers, straps, and massage balls can enhance IT band stretches. For example, a foam roller helps release tension by rolling along the outer thigh. Using a strap allows for deeper stretches by leveraging leverage. A massage ball targets specific knots, improving circulation and reducing stiffness; These tools, when used consistently, can provide longer-lasting relief and improve range of motion for individuals with ITBS. Always consult a professional.

8.2 Stretching for Runners and Cyclists

Runners and cyclists are prone to ITBS due to repetitive knee flexion and extension. Targeted stretches like standing side stretches and cross-leg stretches can help alleviate tightness. These exercises focus on the IT band and surrounding muscles, improving flexibility and reducing friction. Consistency is key, as repetitive motion in these sports often leads to ITBS. Incorporate stretches post-workout to prevent flare-ups and maintain optimal performance. Aim for 20-30 seconds per stretch, 2-3 times daily.

Rehabilitation and Recovery

Rehabilitation focuses on gradual exercises to restore strength and flexibility without causing further irritation. A structured plan ensures a safe return to activity.

9.1 Post-Injury Rehabilitation Exercises

Post-injury rehabilitation focuses on gentle exercises to restore strength and mobility. Initial phases include IT band stretches, quadriceps sets, and step-ups. Progress to mini-squats and balance work. Emphasize proper form to avoid re-injury. Gradually increase intensity as pain subsides. Combining stretching with strengthening helps improve flexibility and reduce discomfort. Consistency and patience are key for full recovery. Always consult a physical therapist to tailor exercises to individual needs and ensure safe progression.

9.2 Timeline for Safe Return to Activity

The timeline for returning to activity varies, typically ranging from 4-8 weeks. Initial rest and stretching are crucial for 1-2 weeks. Low-impact exercises follow, with gradual progression to more intense activities. Full recovery depends on adherence to rehabilitation protocols and pain-free performance of exercises. A structured, phased approach ensures a safe return to sports or daily activities without risking re-injury. Patience and consistency are essential for lasting recovery.

Preventing Future Episodes of ITBS

Preventing ITBS involves consistent stretching, strengthening exercises, and proper footwear. Regularly incorporating IT band stretches and hip-strengthening exercises can reduce recurrence. Avoiding sudden increases in activity and wearing supportive footwear also helps mitigate risks.

10.1 Modifying Training and Activity Levels

To prevent ITBS recurrence, training and activity levels must be carefully managed. Avoiding sudden increases in mileage or intensity is crucial. Incorporating rest days and cross-training can reduce repetitive stress on the IT band. Gradually progressing exercise routines and ensuring proper recovery time strengthens the tissues and minimizes the risk of overuse injuries. Consistency in training modification is key to long-term prevention.

10.2 Proper Footwear and Equipment

Wearing proper footwear and equipment plays a significant role in preventing ITBS. Shoes with adequate arch support and cushioning reduce stress on the IT band during activities. Orthotic inserts can correct biomechanical issues, while compression sleeves or braces provide additional support. Ensuring equipment is suited to your activity and body type minimizes strain, promoting optimal performance and injury prevention; Regularly updating worn-out footwear is essential for long-term protection.

When to Seek Professional Help

Persistent pain, swelling, or limited mobility despite self-care warrants professional consultation. Experts can offer tailored treatments and prevent further complications, ensuring effective recovery and management.

11.1 Red Flags for Severe ITBS

Severe ITBS symptoms include persistent pain, swelling, or limited mobility that doesn’t improve with rest and stretching. If pain worsens during activities or radiates, seek help. Increased tenderness along the IT band or inability to bear weight are critical signs. Ignoring these red flags can lead to prolonged recovery or chronic issues, emphasizing the need for professional evaluation.

11.2 Working with Physical Therapists

Physical therapists play a crucial role in managing ITBS by designing personalized treatment plans. They use advanced techniques like manual therapy, ultrasound, and targeted exercises to reduce inflammation and improve mobility. A PT can also educate patients on proper stretching and strengthening routines, ensuring a safe return to activities while preventing future episodes. Regular follow-ups help track progress and adjust treatments as needed.

ITBS management requires a blend of stretching, strengthening, and lifestyle adjustments. Consistency in exercises and professional guidance are key to long-term relief and prevention of recurrence.

12.1 Summary of Key Points

ITBS is a common overuse injury causing outer knee pain, particularly in runners and cyclists. It occurs due to friction between the iliotibial band and the thigh bone or knee. Proper diagnosis involves physical exams to identify tenderness along the IT band. Effective management includes targeted stretching, strengthening exercises, and lifestyle modifications. Consistency in these practices, along with professional guidance, is essential for recovery and preventing future episodes.

12.2 Final Tips for Managing ITBS

To effectively manage ITBS, incorporate consistent stretching and strengthening exercises into your routine. Use foam rolling for self-myofascial release to reduce tension in the IT band. Gradually modify training intensity and ensure proper footwear to prevent overuse. Maintain a balanced approach with rest and activity to promote healing. Seek professional help if symptoms persist, and prioritize preventive measures to avoid recurrence. Consistency and patience are key to long-term recovery.

Canada

az practice test ontario 2023 pdf

The AZ Practice Test Ontario 2023 PDF is a comprehensive study guide designed to help candidates prepare for the Ontario AZ license exam effectively. It includes sample questions, detailed answers, and insights into the latest regulations, ensuring aspiring truck drivers are well-equipped to excel in their exam and meet industry standards.

Overview of the AZ License in Ontario

The AZ license in Ontario is essential for operating heavy trucks, including tractor-trailers and vehicles exceeding 11,000 kg. To qualify, applicants must be at least 18 years old, pass a medical exam, and demonstrate proficiency in operating heavy vehicles. The license requires both a written knowledge test and a behind-the-wheel driving assessment. Candidates must understand traffic laws, safety regulations, and vehicle handling techniques. The AZ license is crucial for a career in trucking, ensuring drivers meet Ontario’s stringent safety and competency standards.

Importance of Practice Tests for the AZ License Exam

Practice tests are a vital tool for preparing for the AZ license exam, offering a realistic preview of the actual test format and content. They help candidates identify knowledge gaps, improve time management, and build confidence in their abilities. By simulating exam conditions, practice tests enable individuals to refine their understanding of Ontario’s traffic laws, safety protocols, and vehicle operation standards. Regular use of practice tests significantly enhances readiness and reduces anxiety, ensuring a higher likelihood of success on the official AZ license exam.

Benefits of Using the AZ Practice Test Ontario 2023 PDF

The AZ Practice Test Ontario 2023 PDF enhances exam preparation by providing realistic questions, improving knowledge retention, and boosting confidence. It helps identify areas for improvement and ensures familiarity with the exam format, enabling candidates to perform their best on the actual test.

Understanding the Exam Format and Structure

The AZ Practice Test Ontario 2023 PDF mirrors the actual exam format, featuring multiple-choice questions that cover essential topics like road safety, traffic laws, and vehicle inspection. It simulates real test conditions, helping candidates understand the structure, question types, and time limits. This familiarity reduces exam anxiety and ensures candidates are prepared for the content and pacing of the actual AZ license test in Ontario. Regular practice with the PDF enhances readiness and confidence.

Identifying Weak Areas for Improvement

The AZ Practice Test Ontario 2023 PDF allows candidates to pinpoint their weaknesses by answering questions and reviewing results. By identifying incorrect answers, learners can focus on areas needing improvement, such as specific driving laws or safety procedures. This targeted approach ensures efficient study time, helping candidates address gaps in knowledge and build a stronger foundation for the actual exam. Regularly tracking progress through the practice test enhances overall preparedness and confidence in tackling challenging topics.

Building Confidence Before the Actual Exam

The AZ Practice Test Ontario 2023 PDF helps candidates build confidence by familiarizing them with the exam format and content. Regular practice allows individuals to assess their readiness and improve performance. By simulating real exam conditions, the test reduces anxiety and ensures candidates feel prepared. This confidence boost is essential for tackling the actual AZ license exam with assurance and poise, ultimately leading to better results and a smoother testing experience.

Structure of the Ontario AZ Driver’s Test

The Ontario AZ Driver’s Test consists of a written knowledge test and a behind-the-wheel driving test, ensuring candidates demonstrate both theoretical and practical understanding of trucking regulations and skills.

Written Knowledge Test

The written knowledge test for the Ontario AZ license evaluates understanding of trucking regulations, road safety, and vehicle operation. It covers topics like traffic laws, safe driving practices, and cargo handling. The test is multiple-choice, requiring applicants to demonstrate thorough knowledge. Proper preparation using the AZ Practice Test Ontario 2023 PDF ensures familiarity with the format and content, increasing the likelihood of passing. Accurate answers and attention to detail are crucial for success in this phase.

Behind-the-Wheel Driving Test

The behind-the-wheel driving test assesses practical skills in operating a heavy vehicle safely. Applicants must demonstrate proficiency in pre-trip inspections, basic vehicle control, and specific maneuvers like reversing and turning. The test evaluates ability to handle the truck confidently and adhere to traffic rules. Using the AZ Practice Test Ontario 2023 PDF helps candidates familiarize themselves with the exam format and focus on areas needing improvement. Regular practice and review ensure a higher likelihood of passing this critical phase.

Specific Requirements for Heavy Vehicles

The AZ license requires understanding specific regulations for heavy vehicles, including pre-trip inspections, cargo securement, and weight restrictions. Drivers must adhere to hours of service rules to prevent fatigue. Proper handling of brakes, tires, and load distribution is essential. Familiarity with size and weight limits on bridges and roads is also critical. The AZ Practice Test Ontario 2023 PDF highlights these requirements, ensuring candidates are well-prepared to operate heavy vehicles safely and legally. Regular practice helps reinforce these critical guidelines.

Where to Find the AZ Practice Test Ontario 2023 PDF

The AZ Practice Test Ontario 2023 PDF can be found on official government websites, reputable driving schools, or trusted online platforms offering Ontario-specific study materials.

Official Government Sources

The Ontario government provides official resources for the AZ practice test through their DriveTest website and ServiceOntario portals. These sources ensure authenticity and alignment with the latest regulations. Candidates can access downloadable PDFs, which include sample questions and study guides. Additionally, the Ontario Ministry of Transportation (MTO) website offers detailed handbooks and practice materials. These resources are regularly updated to reflect current laws and driving standards, making them the most reliable option for exam preparation. Candidates are encouraged to utilize these official materials for accurate and comprehensive study.

Reputable Driving Schools and Training Centers

Reputable driving schools and training centers in Ontario offer high-quality AZ practice tests and study materials. Institutions like A-Z Truck Training and Ontario Truck Training Academy provide structured resources that mimic the actual exam. These centers often include downloadable PDF guides, practice questions, and detailed explanations. Many schools also offer online platforms for easy access. Their materials are frequently updated to align with current regulations, ensuring candidates receive accurate and relevant information. Enrolling in such courses can significantly enhance preparation and understanding of the AZ license requirements.

Online Platforms and Forums

Online platforms and forums are excellent sources for accessing the AZ Practice Test Ontario 2023 PDF. Websites like AZPracticeTest.ca and OntarioTruckerTest.com offer downloadable PDFs and practice questions. Forums such as TruckingForum.com and OntarioTruckersHub.com allow users to share resources and discuss exam strategies. These platforms often provide free or paid resources, ensuring candidates can access updated materials. They also offer interactive features like progress tracking and discussion threads, making exam preparation more efficient and collaborative.

How to Effectively Use the AZ Practice Test

To effectively use the AZ Practice Test Ontario 2023 PDF, candidates should focus on time management, understanding the exam structure, and identifying areas for improvement.

Time Management and Study Schedules

Effective time management is crucial for success. Create a study schedule to allocate time for each section of the AZ Practice Test Ontario 2023 PDF. Dedicate specific periods to review driving laws, regulations, and safety protocols. Set timers to simulate exam conditions, ensuring familiarity with time constraints. Consistency is key; regular practice helps build rhythm and confidence. By adhering to a structured plan, candidates can efficiently cover all topics, leading to better retention and exam readiness. This approach ensures thorough preparation and reduces anxiety.

Focusing on High-Weightage Topics

Prioritizing high-weightage topics is essential for effective preparation. The AZ Practice Test Ontario 2023 PDF highlights key areas frequently tested, such as driving laws, safety regulations, and vehicle inspection procedures. By focusing on these critical sections, candidates can allocate their study time more efficiently. This targeted approach ensures better knowledge retention and improved performance on the actual exam. Regularly reviewing these topics helps build confidence and familiarity with the material, making it easier to tackle challenging questions during the test. Stay focused and strategic to maximize results.

Simulating Real Exam Conditions

Simulating real exam conditions with the AZ Practice Test Ontario 2023 PDF helps build familiarity and reduces anxiety. Set a timer to mimic the actual test duration and create a quiet, distraction-free environment. This approach allows you to practice under pressure, improving time management and decision-making skills. Reviewing your responses afterward ensures you understand your mistakes and can avoid them in the future. By replicating the exam experience, you gain confidence and a clearer understanding of what to expect on test day. Stay focused and prepared.

Common Mistakes to Avoid During Practice

Ignoring key details in questions, failing to review incorrect answers, and skipping the handbook are common mistakes. Address these to ensure thorough preparation and better results.

Overlooking Important Details in Questions

One of the most common mistakes during practice is rushing through questions and missing critical details. This can lead to incorrect answers and a lower score. To avoid this, take your time to read each question thoroughly, paying attention to specific keywords and instructions. Use a highlighter to mark important parts of the question or options. Regular breaks can help maintain focus and reduce oversight. Practicing active reading and staying calm will improve accuracy and ensure no details are missed.

Not Reviewing Incorrect Answers

Failing to review incorrect answers during practice is a significant oversight, as it prevents learners from understanding their mistakes. Without this step, candidates may repeat errors in the actual exam, leading to lower scores. To avoid this, always analyze wrong answers, identify knowledge gaps, and revisit relevant sections of the handbook or study materials. This process reinforces learning and ensures a stronger grasp of the material, ultimately improving performance and confidence for the AZ license test. Regular review is essential for success.

Skipping the Handbook

Skipping the Ontario Driver’s Handbook is a common mistake that can hinder effective preparation for the AZ license exam. The handbook contains detailed information on traffic laws, safe driving practices, and specific regulations for heavy vehicles. Relying solely on practice tests may leave gaps in knowledge, as they often don’t cover every nuance. Candidates should thoroughly review the handbook to ensure a complete understanding of all requirements and regulations, complementing their practice test efforts with this essential resource for a well-rounded preparation strategy.

The AZ Practice Test Ontario 2023 PDF is a valuable resource for preparing for the AZ license exam, offering insights and practical questions to ensure success. By combining it with thorough study of the handbook, candidates can confidently tackle the exam and achieve their goal of becoming a licensed truck driver in Ontario. Good luck!

Final Tips for Success

To excel on the AZ license exam, thoroughly review the Ontario Truck Handbook and regularly practice with the AZ Practice Test Ontario 2023 PDF. Dedicate time to understanding each topic, especially high-weightage sections like road safety and vehicle inspection. Simulate real exam conditions during practice to build confidence. Focus on improving weak areas identified through practice tests and ensure you understand the reasoning behind each answer. Consistent effort and a strategic study plan will significantly enhance your chances of success. Stay calm and well-prepared!

PDF

how to enlarge a pdf for printing

Enlarging a PDF for printing involves adjusting page scaling, custom sizes, or using tools like Adobe Acrobat, PDFelement, or Preview. Adjust scaling options, fit pages to printable areas, or use poster modes to ensure clarity and professional results.

Enlarging a PDF for printing is a common requirement when the original document is too small to read or when specific details need to be emphasized. Whether it’s for professional presentations, academic materials, or personal projects, ensuring the PDF is properly scaled ensures clarity and readability. Many users encounter situations where the text or images in a PDF are too tiny, making it difficult to understand the content when printed. This is especially true for diagrams, charts, or posters that require larger formats. Fortunately, modern software and tools provide straightforward methods to enlarge PDFs without compromising quality. From using professional applications like Adobe Acrobat to leveraging built-in features in Preview on Mac or the Windows Print Dialog, there are multiple approaches to achieve the desired size. Additionally, online tools and alternative software like WPS Office offer flexible solutions for resizing PDFs. This guide will walk you through these methods step-by-step, ensuring your PDF prints perfectly every time.

Using Adobe Acrobat to Enlarge PDFs

Adobe Acrobat is a powerful tool for enlarging PDFs, offering precise control over page scaling and print settings. To begin, open your PDF in Adobe Acrobat and navigate to the File menu, then select Print. In the print dialog, locate the Page Scaling section and choose the Custom Scale option. Here, you can adjust the zoom level to your desired percentage. For larger prints, you may also use the Tile Large Pages feature, which splits the PDF into multiple pages for poster-sized outputs. Additionally, Acrobat allows you to create custom page sizes, ensuring your document fits specific printing requirements. To do this, go to Properties, select Adobe PDF as the printer, and define a custom page size under the Page Setup tab. After adjusting settings, print the document to a new PDF file. This method is ideal for professional results, maintaining clarity and quality even at larger scales. By utilizing these features, you can easily enlarge your PDFs for printing with precision and confidence.

Enlarging PDFs with PDFelement

PDFelement is a versatile tool that simplifies the process of enlarging PDFs for printing. To start, open your PDF file in PDFelement and click on the File tab in the top menu. From there, select the Print option to access the print dialog box. In this dialog, you’ll find options to adjust the page scaling, allowing you to customize the size of your PDF. Choose the Custom Scale option to set a specific zoom percentage, ensuring your document is enlarged to your desired size. Additionally, PDFelement offers the ability to Fit to Printable Area, which automatically adjusts the PDF to fit the selected paper size. For more precise control, you can also create custom page sizes to match your printing needs. Once your settings are configured, click Print to produce an enlarged version of your PDF. PDFelement’s user-friendly interface and robust features make it an excellent choice for achieving professional-quality prints with ease.

Enlarging PDFs via Windows Print Dialog

To enlarge a PDF for printing using the Windows Print Dialog, open the PDF file in your preferred viewer, such as Adobe Reader or Edge. Press Ctrl+P to open the print dialog box. In the dialog, locate the Page Scaling or Scaling options, where you can choose from predefined sizes like Fit, Custom Scale, or Scale to Fit. For precise control, select the Custom Scale option and enter a percentage larger than 100% to enlarge the document. If you need to print the PDF across multiple pages, enable Poster mode or Tile large pages, which divides the content into manageable sections. Adjust the page orientation to Landscape for wider layouts and ensure the paper size matches your printer’s capabilities. After configuring these settings, preview the layout to confirm the enlargement meets your needs. Finally, click Print to produce your enlarged PDF. This method is straightforward and effective for achieving clear, professionally sized prints directly from Windows.

Enlarging PDFs on Mac with Preview

To enlarge a PDF for printing on a Mac using Preview, open the PDF file and navigate to File > Print. In the print dialog, select the Page Scaling dropdown and choose a custom scale to enlarge the document. You can also use the Tile Large Pages option to split the PDF into multiple pages for printing. Adjust the Orientation to Landscape if needed and select the appropriate paper size from the Paper Size menu. Preview allows you to visualize the changes in the print preview pane, ensuring the enlarged PDF meets your requirements. After configuring the settings, click Print to produce your enlarged document. This method is user-friendly and ideal for Mac users seeking a quick and efficient way to enlarge PDFs without additional software. The ability to save print dialog presets makes it even more convenient for future use.

Using Online Tools to Resize PDFs

Online tools provide a convenient way to resize PDFs for printing without installing software. Websites like Smallpdf, ILovePDF, and DocHub offer free resizing options. Simply upload your PDF, adjust the scaling percentage or page size, and download the resized file. Some tools allow custom dimensions, ensuring your PDF fits standard paper sizes like A4 or Letter. These platforms are ideal for quick adjustments and are accessible from any browser. Many online tools also support multiple formats and offer additional features like cropping or rotating pages. To use these services, follow these steps:

  1. Visit the website and upload your PDF.
  2. Select the resizing option and choose your preferred scale or dimensions.
  3. Preview the changes and download the resized PDF.

These tools are user-friendly, fast, and perfect for users who need occasional resizing without advanced software. However, be mindful of file size limits and security when using free online services. This method is great for enlarging PDFs for printing, ensuring clarity and proper formatting.

Enlarging PDFs with Google Chrome

Google Chrome offers a straightforward method to enlarge PDFs for printing directly from the browser. Open the PDF in Chrome by dragging and dropping it into a new tab. Once loaded, press Ctrl + P (Windows) or Cmd + P (Mac) to open the print dialog. In the print settings, navigate to the More settings section and locate the Scale option. Here, you can select a custom scale percentage (e.g., 150% or 200%) to enlarge the PDF. Additionally, you can choose the Poster option under Pages per sheet to split the enlarged PDF into multiple pages for printing. After adjusting the settings, click Print to save the enlarged PDF or send it directly to your printer. This method is quick and doesn’t require additional software, making it ideal for occasional use. However, note that Chrome’s built-in PDF viewer doesn’t support custom page sizes, so you may need to adjust scaling manually for best results. Always preview the output to ensure the enlargement meets your requirements before finalizing the print job. This approach is simple yet effective for enlarging PDFs when you need a quick solution.

Enlarging PDFs with WPS Office

WPS Office provides an efficient way to enlarge PDFs for printing. Open the PDF in WPS Office PDF, then click the Zoom In button to increase the view size. For precise adjustments, go to File > Print. In the print dialog, locate the Page Scaling section and select Custom Scale, choosing your desired percentage. You can also use the Fit to Printable Area option to ensure the PDF fits your paper size. Additionally, WPS Office allows you to adjust page orientation and margins for optimal printing. After setting your preferences, click Print to produce an enlarged version of your PDF. This method is user-friendly and suitable for both personal and professional use, offering flexibility to customize your print settings as needed. WPS Office is a reliable tool for enlarging PDFs without compromising quality, making it a great alternative to other software. Always preview your document to ensure the enlarged version meets your requirements before printing. This ensures your PDFs are clear and professional when printed.

Additional Tools and Methods for Enlarging PDFs

Beyond the popular tools, several other methods and software can help enlarge PDFs for printing. Foxit Reader is a reliable option, allowing you to adjust scaling percentages in the print dialog. Online converters like Smallpdf or ILovePDF offer free resizing options, enabling you to crop, split, or compress PDFs to fit your needs. For advanced users, Photoshop Elements or Photoshop CC can be used to crop and resize PDFs before printing. Simply import the PDF, adjust dimensions, and save it for printing. Additionally, some web browsers, like Google Chrome, allow you to enlarge PDFs using the print preview feature. Open the PDF in Chrome, press Ctrl+P, and use the Custom Scale option to adjust the size. These methods provide flexibility, ensuring your PDFs are printed clearly and professionally. Whether using dedicated software or online tools, resizing PDFs for printing is straightforward and accessible to all users.

PDF

king of battle and blood pdf

An enchanting tale of forbidden union, where love clashes with war. Scarlett St. Clair introduces Isolde and Adrian in a dangerous world of passion and power.

Book Overview

King of Battle and Blood by Scarlett St. Clair is a captivating fantasy novel that intertwines forbidden romance and political intrigue. Isolde de Lara, a determined princess, marries vampire king Adrian Aleksandr Vasiliev to end a brutal war, but her assassination attempt fails. As tensions rise, their complex relationship unfolds, blending danger, passion, and power. The first in the Adrian X Isolde series, it sets the stage for a dark, alluring tale.

Historical Context

The novel is set in a world where humans and vampires have long been embroiled in conflict. Centuries of war between their realms form the backdrop for Isolde and Adrian’s story. The marriage between a human princess and a vampire king is a rare, politically fraught union, reflecting the tense coexistence of their species. This historical animosity shapes the plot and characters’ motivations, adding depth to their forbidden relationship.

Author Background: Scarlett St; Clair

Scarlett St. Clair holds a master’s in library science and a bachelor’s in English writing. Known for her Hades & Persephone series, she masterfully blends romance with dark fantasy.

Brief Biography

Scarlett St. Clair is a bestselling author known for her Hades & Persephone series and When Stars Come Out. She holds a master’s degree in library science and a bachelor’s in English writing. Her passion for Greek mythology, murder mysteries, and the afterlife shines through her dark fantasy and romance novels, captivating readers worldwide.

Writing Style and Influences

Scarlett St. Clair’s writing blends dark fantasy, romance, and intense drama, drawing inspiration from mythology and folklore. Her vivid world-building and complex characters, like Adrian and Isolde, reflect her love for Greek myths and dark, atmospheric storytelling. Fans of Sarah J. Maas and Jennifer L. Armentrout will find her style compelling, with strong female leads and morally ambiguous heroes.

Plot Summary

Isolde de Lara marries vampire king Adrian to end a war, planning his assassination. However, her attempt fails, sparking a dangerous game of power and desire.

Setting and World-Building

The story unfolds in a dark, gothic-inspired world where humans and vampires coexist in tension. The vampire court, ruled by Adrian, is a place of brutal politics and ancient secrets. Isolde navigates this treacherous realm, where power and passion collide, and the line between love and war blurs. The setting is rich with intrigue, shaping the characters’ motives and conflicts.

Main Conflict and Key Events

Isolde’s primary conflict is her forced marriage to vampire king Adrian, aimed at ending a prolonged war. Her initial assassination attempt fails, leading to Adrian’s threat of turning her undead. As Isolde navigates the dangerous vampire court, she uncovers secrets about Adrian’s past and their realms, intensifying their volatile relationship and the stakes of their union. Betrayal and desire fuel the escalating tension.

Themes and Genres

A dark fantasy romance blending love, betrayal, and power. Themes of moral ambiguity and forbidden passion dominate, set against a backdrop of war and political intrigue, captivatin

Love vs. War

Isolde and Adrian’s tumultuous relationship embodies the clash between love and war. Their intense attraction contrasts with the brutal conflict surrounding them, as Isolde’s political marriage becomes a battleground of emotions. The story explores how love can both unite and divide, even amidst the chaos of war, leaving Isolde torn between her duty and her growing feelings for the enigmatic vampire king.

Power Dynamics

The novel explores the intricate balance of power between Isolde and Adrian, as both navigate their roles as rulers and adversaries. Isolde, though initially subordinate, challenges Adrian’s authority, revealing her resilience and strategic mind. Their relationship mirrors the broader struggle for dominance in their war-torn world, where power is both a weapon and a fragile illusion, shifting unpredictably between them.

Moral Ambiguity

The novel delves into the gray areas between right and wrong, as Isolde and Adrian navigate a world where survival often demands ruthless choices. Both characters grapple with their own moral codes, blurring the lines between heroism and villainy. Their actions, driven by revenge and self-preservation, challenge the notion of clear-cut morality, leaving readers questioning the true meaning of justice and sacrifice.

Character Analysis

In “King of Battle and Blood,” Isolde de Lara is a strong-willed princess, while Adrian Aleksandr Vasiliev is a mysterious, powerful vampire king. Their complex relationship drives the story.

Adrian Aleksandr Vasiliev

Adrian Aleksandr Vasiliev is the enigmatic vampire king, whose fierce and merciless nature commands fear. His mysterious past and calculating demeanor make him a formidable ruler. Despite his savage reputation, his undeniable chemistry with Isolde and hidden motives add depth to his character, making him both intriguing and complex in this dark fantasy world.

Isolde de Lara

Isolde de Lara is a determined princess forced into a perilous political marriage with vampire king Adrian. She enters the union with the intent to kill, but her plan fails, leaving her at Adrian’s mercy. Her defiance and strength shine as she navigates the treacherous vampire court, fearing Adrian more than the court itself. Her journey is one of survival, secrets, and unraveling the mysteries of her enigmatic consort.

The Adrian X Isolde Series Overview

The Adrian X Isolde series by Scarlett St. Clair is a dark fantasy saga. King of Battle and Blood is the first installment, with a sequel, Queen of Myth and Monsters, expected to continue the epic tale.

Series Background

Scarlett St. Clair’s Adrian X Isolde series debuts with King of Battle and Blood, a dark fantasy romance. Following her Hades & Persephone series, this saga explores forbidden love and power struggles. Set in a world of vampires and political intrigue, it captivates fans of intense romance and epic conflicts, blending danger with passion in a gripping narrative.

Future Installments

The Adrian X Isolde series is expected to expand with Queen of Myth and Monsters, promising to delve deeper into the mystical world and complex characters. Fans anticipate more intense conflicts and romantic twists, building on the dark fantasy and political intrigue introduced in King of Battle and Blood. The next installment aims to captivate readers with its gripping continuation of Isolde and Adrian’s story.

Reception and Reviews

King of Battle and Blood has captivated readers with its dark fantasy and intense romance, becoming an instant USA Today bestseller. Fans praise its compelling characters and twist-filled plot, while critics highlight its fresh take on vampire lore and political intrigue, solidifying its place in the fantasy genre.

Critical Reception

Critics praise King of Battle and Blood for its dark, immersive world-building and intense romance, with many noting its fresh take on vampire lore. However, some reviewers found the character development lacking, particularly with Adrian, and the plot’s political intrigue underexplored. Despite this, the book has been hailed as a compelling addition to the fantasy genre, with its dangerous court dynamics and forbidden love captivating readers worldwide.

Fan Reactions

Fans rave about the intense chemistry between Isolde and Adrian, praising the forbidden romance and dark fantasy elements. Readers applaud Scarlett St. Clair’s ability to weave danger, desire, and political intrigue, creating a captivating narrative. Many express eagerness for the next installment, while some note a desire for deeper world-building to enhance the immersive experience of the vampire realm.

Availability and Formats

King of Battle and Blood is available as a PDF for digital download, published by Sourcebooks in 2021, part of the Adrian X Isolde series.

Publication Details

King of Battle and Blood was published by Sourcebooks on November 30, 2021. It is part of the Adrian X Isolde series, with a print length of 400 pages. The book is available in English, and its ISBN-10 is listed for reference. This marks Scarlett St. Clair’s entry into the vampire fantasy genre, following her success with the Hades Saga.

Digital Availability

King of Battle and Blood is widely available in digital formats. Readers can access the eBook through platforms like Amazon Kindle and Barnes & Noble. Additionally, PDF versions can be downloaded from various online sources, including Libgen and OverDrive. The book is also part of the hoopla BONUS BORROWS COLLECTION, allowing library members to borrow it without using their monthly limits.

A gripping tale of love and war, King of Battle and Blood captivates readers, leaving them eagerly anticipating the next installment in Scarlett St. Clair’s series.

Final Thoughts

King of Battle and Blood is a captivating blend of romance, power, and danger; Scarlett St. Clair crafts a compelling narrative with complex characters and morally ambiguous themes. Fans of fantasy and vampire lore will find themselves drawn to Isolde and Adrian’s tumultuous relationship. The book’s dark, passionate tone and intricate world-building make it a standout in the genre, leaving readers eager for more.

Recommendation

Enthralling readers with its dark fantasy elements, King of Battle and Blood is a must-read for fans of forbidden romance. Scarlett St. Clair masterfully weaves a tale of morally complex characters, intense passion, and political intrigue. Ideal for those who enjoy Sarah J. Maas and Jennifer L. Armentrout, this book promises a captivating journey into a world of vampires and royal courts.

Manuals

commerce acquisition manual

The Commerce Acquisition Manual (CAM) serves as a comprehensive guide for businesses to streamline customer acquisition processes, outlining strategies to attract and retain customers effectively while ensuring compliance with industry standards and regulations.

1.1 Definition and Importance of Customer Acquisition in E-commerce

Customer acquisition in e-commerce refers to the process of identifying, attracting, and converting potential customers into buyers. It is vital for revenue growth, market expansion, and competitiveness, yet acquiring new customers often costs more than retaining existing ones, emphasizing the need for strategic optimization through tools like the Commerce Acquisition Manual (CAM).

1.2 Overview of the Commerce Acquisition Manual (CAM)

The Commerce Acquisition Manual (CAM) provides a structured framework for effective customer acquisition, offering guidelines on strategies, tools, and compliance. It helps businesses optimize their acquisition processes, reduce costs, and enhance customer retention, ensuring alignment with industry standards and regulations for sustainable growth and profitability in e-commerce.

Key Strategies for Customer Acquisition

Key strategies include organic search optimization, paid advertising, social media marketing, and content-driven campaigns. These methods help attract, engage, and convert potential customers into loyal buyers effectively.

2.1 Organic Search Optimization

Organic search optimization is a cornerstone of customer acquisition, focusing on improving visibility in search engines through relevant keywords, quality content, and optimized website structures. This strategy drives sustainable, cost-effective traffic and enhances brand credibility, making it a crucial element in long-term e-commerce success.

2.2 Paid Advertising Campaigns

Paid advertising campaigns are a direct and impactful method to attract new customers. Platforms like Google Ads, social media ads, and sponsored content enable targeted marketing, ensuring your message reaches the right audience. By setting clear budgets and optimizing ad creatives, businesses can achieve measurable ROI and accelerate customer acquisition effectively.

2.3 Social Media Marketing

Social media platforms like TikTok, Instagram, and Facebook are powerful tools for customer acquisition. They enable businesses to engage with target audiences through tailored content, influencers, and interactive campaigns, fostering brand loyalty and driving conversions. Regular analytics monitoring ensures optimal performance and continuous improvement of strategies to maximize reach and impact effectively.

2.4 Content Marketing and Email Campaigns

Content marketing and email campaigns are vital for customer acquisition. High-quality, relevant content attracts and retains audiences, while personalized emails drive engagement and conversions. Segmented email lists and compelling CTAs enhance effectiveness, fostering customer loyalty and repeat business, ultimately contributing to sustainable growth and revenue generation for e-commerce businesses.

2.5 Referral and Loyalty Programs

Referral and loyalty programs incentivize customers to refer others and make repeat purchases. These programs boost retention and acquisition by rewarding customers with discounts, points, or exclusive offers, creating a win-win scenario that fosters long-term customer relationships and drives sustainable growth for e-commerce businesses.

E-commerce Acquisition Channels

E-commerce acquisition channels include platforms like TikTok, Meta, and Alphabet, which drive sales through targeted ads and organic reach, while email marketing continues to grow as a key acquisition tool.

3.1 TikTok as a Sales Driver

TikTok has emerged as a powerful sales driver in e-commerce, with studies showing it often outperforms Meta and Alphabet platforms in converting interest into purchases. Its algorithm-driven “For You” page and short-form, engaging content make it ideal for brands to capture new customers, with some reporting acquisition rates as high as 4.5%. Creative campaigns and influencer partnerships further enhance its effectiveness.

3.2 Meta and Alphabet Platforms

Meta and Alphabet platforms remain crucial for customer acquisition, leveraging advanced targeting options and vast user bases. While TikTok may excel in certain niches, these platforms offer robust tools for precise audience engagement, enabling businesses to optimize campaigns effectively and drive consistent growth through tailored ads and analytics-driven strategies.

3.3 Email Marketing Growth

Email marketing has seen significant growth as a customer acquisition channel, offering precise targeting through segmentation and personalization. Its cost-effectiveness and high ROI make it a vital tool for businesses, enabling them to nurture leads and drive conversions effectively while maintaining strong customer relationships.

Optimizing Customer Acquisition Costs (CAC)

Optimizing CAC involves reducing expenses while maintaining or increasing customer acquisition rates, ensuring sustainability and profitability for businesses in competitive markets through strategic planning and efficient resource allocation.

4.1 Calculating CAC

Calculating Customer Acquisition Cost (CAC) involves dividing total marketing expenses by the number of new customers acquired. The formula is CAC = Total Marketing Expenses / Number of New Customers. This metric helps businesses understand the cost-effectiveness of their acquisition strategies and optimize resource allocation for better ROI.

4.2 Reducing CAC through Personalization

Personalizing customer experiences enhances engagement and conversion rates, reducing CAC. Tailored content, product recommendations, and segmented campaigns ensure messaging resonates with target audiences, increasing efficiency. Data-driven insights enable businesses to deliver relevant offers, lowering acquisition costs while improving customer satisfaction and retention.

4.3 A/B Testing for Campaign Optimization

A/B testing identifies optimal marketing strategies by comparing different campaign elements. By analyzing performance metrics, businesses can refine content, CTAs, and targeting, improving conversion rates and reducing CAC. Continuous testing ensures campaigns remain effective, adapting to customer preferences and market trends for sustained growth and efficiency.

4.4 Retargeting Strategies

Retargeting strategies focus on re-engaging potential customers who have previously interacted with your brand but didn’t convert. By using dynamic ads and personalized content, businesses can remind users of abandoned carts or viewed products, increasing the likelihood of conversion and improving overall campaign ROI through targeted, relevant messaging.

Tools and Technologies for Acquisition

Essential tools include Google Analytics for tracking, Facebook Pixel for targeting, and CRM systems for managing customer interactions, enabling businesses to streamline and optimize their acquisition efforts effectively.

5.1 Google Analytics for Tracking

Google Analytics is a powerful tool to track website visitors, measure conversion rates, and analyze customer behavior, helping businesses optimize acquisition strategies. Integration with other platforms enhances data accuracy, while compliance with data regulations like GDPR ensures secure and ethical tracking practices.

5.2 Facebook Pixel for Targeting

Facebook Pixel is a crucial tool for tracking user interactions and optimizing ad campaigns. It helps businesses target specific audiences, measure ad performance, and improve conversion rates. By integrating with Facebook’s platform, Pixel enables precise customer insights, ensuring campaigns are tailored to user behavior and preferences.

5.3 CRM Systems for Customer Management

CRM systems streamline customer interactions, enabling businesses to track behaviors and preferences. They enhance acquisition by personalizing experiences and improving engagement. By aligning sales, marketing, and support, CRMs foster loyalty and retention, ensuring a seamless customer journey from acquisition to long-term relationship management.

Metrics for Measuring Success

Key metrics like Customer Acquisition Rate (CAR), Conversion Rate, and Customer Lifetime Value (CLV) help measure the effectiveness of acquisition strategies and overall business performance.

6.1 Customer Acquisition Rate (CAR)

Customer Acquisition Rate (CAR) measures the percentage of new customers acquired over a specific period. It helps businesses evaluate marketing effectiveness and optimize strategies to attract and retain customers, ensuring sustainable growth and profitability in the competitive e-commerce landscape while maintaining cost efficiency.

6.2 Conversion Rate Analysis

Conversion Rate Analysis evaluates the proportion of website visitors completing a desired action, such as purchases. This metric provides insights into campaign effectiveness and user engagement, helping businesses refine marketing strategies to enhance customer interactions and maximize revenue generation through optimized e-commerce platforms and targeted advertising efforts.

6.3 Customer Lifetime Value (CLV)

Customer Lifetime Value (CLV) measures the total revenue a business can expect from a customer over their relationship lifespan. CLV helps assess long-term profitability and informs strategies to enhance retention and satisfaction, ensuring sustainable growth and maximizing returns on acquisition and retention investments in the e-commerce landscape.

Challenges in Customer Acquisition

Rising costs, data privacy concerns, and balancing acquisition with retention are key hurdles in e-commerce. These challenges require strategic adjustments to maintain profitability and customer trust effectively.

7.1 Rising CAC in E-commerce

Rising Customer Acquisition Costs (CAC) in e-commerce pose significant challenges, as businesses face increased marketing expenses. According to a study by SimplicityDX, CAC has surged by 222% over eight years, driven by competitive markets and evolving consumer behaviors, making cost optimization critical for sustaining growth and profitability in the industry.

7.2 Data Privacy Concerns

Data privacy concerns significantly impact e-commerce acquisition strategies, as stringent regulations like GDPR and CCPA require businesses to protect consumer information. Misusing data can erode trust, leading to lost customers and increased acquisition costs, emphasizing the need for compliance and transparent data practices to maintain customer loyalty and legal adherence.

7.3 Balancing Acquisition and Retention

E-commerce businesses often face the challenge of balancing customer acquisition with retention. While acquiring new customers drives growth, retaining existing ones is cost-effective. Striking this balance requires personalized marketing, loyalty programs, and exceptional customer service to ensure long-term profitability and sustained business growth in a competitive market landscape.

Future Trends in Commerce Acquisition

Future trends include AI-driven marketing, predictive analytics, and personalized shopping experiences. These innovations aim to enhance customer engagement and streamline acquisition processes for sustained growth in e-commerce.

8.1 Emerging Technologies

Emerging technologies like AI, blockchain, and IoT are revolutionizing commerce acquisition. AI enhances customer insights, blockchain ensures secure transactions, while IoT enables seamless omnichannel experiences, driving efficiency and personalization in acquiring new customers and fostering long-term loyalty in the competitive e-commerce landscape.

8.2 AI-Driven Marketing

AI-driven marketing leverages machine learning to analyze customer behavior, enabling personalized campaigns and predictive analytics. By automating targeting and optimizing ad spend, AI enhances ROI, delivering tailored messages to the right audience, thus accelerating customer acquisition and retention in e-commerce effectively.

8.3 Predictive Analytics

Predictive analytics uses historical data and machine learning to forecast customer behavior and market trends. By identifying potential buyers and optimizing marketing strategies, it enhances customer acquisition efficiency and drives business growth in the competitive e-commerce landscape.

Compliance and Legal Considerations

Compliance with data protection regulations and consumer privacy laws is critical for e-commerce acquisition. Ensuring contractual obligations and transparency builds trust, avoiding legal risks and fostering long-term customer relationships.

9.1 Data Protection Regulations

Data protection regulations ensure customer information is securely managed. Compliance with GDPR, CCPA, and other laws is essential to avoid penalties and maintain trust. Businesses must implement robust encryption, access controls, and transparent data practices to safeguard personal information and uphold legal standards in e-commerce acquisition processes effectively.

9.2 Consumer Privacy Laws

Consumer privacy laws, such as GDPR and CCPA, mandate businesses to protect user data and ensure transparency. Organizations must obtain explicit consent, allow data access, and enable deletion rights. Non-compliance risks hefty fines and reputational damage, emphasizing the need for stringent privacy practices in commerce acquisition strategies to build customer trust and loyalty.

9.4 Contractual Compliance

Contractual compliance ensures adherence to agreed-upon terms, mitigating legal risks. Regular audits and thorough reviews of agreements are essential to uphold obligations, protect rights, and maintain trust. Proper documentation and communication with stakeholders are critical to avoid disputes and ensure seamless execution of contractual requirements in commerce acquisition processes.

Case Studies and Best Practices

Real-world applications and proven strategies highlight effective customer acquisition techniques. Analyzing successful campaigns provides insights into optimizing marketing efforts and improving conversion rates for sustainable business growth.

10.1 Successful Acquisition Campaigns

Notable campaigns demonstrate how brands leverage data-driven strategies, personalized messaging, and multi-channel approaches to maximize reach and conversions. TikTok’s viral challenges, targeted email marketing, and influencer partnerships exemplify effective tactics, showcasing measurable results and customer engagement, as highlighted in recent e-commerce reports and studies.

10.2 Industry Benchmarks

Industry benchmarks provide insights into standard metrics for customer acquisition, such as average CAC, conversion rates, and ROI. Recent reports highlight rising CAC in e-commerce, with studies showing a 222% increase over eight years, emphasizing the need for optimized strategies to remain competitive and cost-effective in acquiring new customers.

PDF

the cultural landscape pdf

Cultural landscapes are areas where human interaction with nature has shaped a distinctive environment, blending natural and cultural elements․ They reflect historical, social, and spiritual values, offering insights into human evolution and cultural diversity․ Recognized by UNESCO, these landscapes are vital for understanding our shared heritage and preserving it for future generations․

1․1 Definition and Significance

A cultural landscape is a geographic area that reflects the interaction between humans and their natural environment over time․ It embodies the combined works of nature and human creativity, representing a unique synthesis of cultural, social, and ecological elements․ These landscapes are not merely physical spaces but also carry deep historical, spiritual, and symbolic meanings․ They are integral to the identity of communities, preserving traditions, beliefs, and practices that have been passed down through generations․ The significance of cultural landscapes lies in their ability to tell the story of human evolution, cultural diversity, and the interconnectedness of people and nature․ They serve as living archives, offering insights into past and present societies․ Protecting these landscapes is essential for maintaining cultural heritage, fostering sustainable development, and promoting cross-cultural understanding․ By conserving cultural landscapes, we preserve not only the physical environment but also the intangible values that define human civilization․

UNESCO’s Role in Cultural Landscapes

UNESCO plays a pivotal role in identifying, designating, and protecting cultural landscapes globally․ Through the World Heritage Convention, UNESCO promotes the conservation of these unique sites, ensuring their cultural and natural values are preserved for future generations․

2․1 The 1972 World Heritage Convention

The 1972 World Heritage Convention, established by UNESCO, is a landmark treaty aimed at conserving the world’s cultural and natural heritage․ It recognizes the importance of protecting sites that hold exceptional universal value, ensuring their preservation for future generations․ The convention laid the groundwork for identifying and safeguarding cultural landscapes, emphasizing their role in human history and cultural diversity․ By fostering international cooperation, it has enabled the protection of over 1,000 sites worldwide, including 30 designated cultural landscapes․ This framework highlights the interconnectedness of natural and cultural elements, providing a global approach to heritage conservation․

2․2 Operational Guidelines and Categories

UNESCO’s Operational Guidelines for the Implementation of the World Heritage Convention provide a framework for identifying, managing, and preserving cultural landscapes․ These guidelines define cultural landscapes as areas where natural and human-made elements have interacted over time, creating a unique environment․ They establish three main categories: designed, organic, and associative cultural landscapes․ Designed landscapes are intentionally created, such as gardens or parks․ Organic landscapes evolve naturally over time, often reflecting traditional land-use patterns․ Associative landscapes are valued for their spiritual or cultural significance․ The guidelines emphasize the importance of preserving these landscapes’ integrity and authenticity․ They also outline criteria for inscription on the World Heritage List and provide strategies for sustainable management․ Regular updates to the guidelines ensure they address emerging challenges and evolving conservation practices, ensuring cultural landscapes remain protected for future generations․

Categories of Cultural Landscapes

3․1 Designed Cultural Landscapes

Designed cultural landscapes are intentionally created environments, such as gardens, parks, or religious sites, reflecting artistic, aesthetic, or symbolic values․ They are planned and maintained to achieve specific cultural or spiritual goals, showcasing human creativity and intentionality․

Designed cultural landscapes are intentionally created environments that reflect artistic, aesthetic, or symbolic values․ These landscapes, such as gardens, parks, or religious sites, are planned and maintained to achieve specific cultural or spiritual goals․ They embody human creativity and intentionality, often serving as symbols of identity, spirituality, or power․ Examples include formal gardens like Versailles or the Taj Mahal, where design and architecture are central to their cultural significance․ These landscapes are recognized for their universal value, as they provide insights into human history, creativity, and the interaction between culture and nature․ Designed cultural landscapes are often inscribed as UNESCO World Heritage Sites, highlighting their importance in preserving global cultural diversity․ They require careful management to maintain their integrity and continue to inspire future generations․ By blending nature with human design, these landscapes showcase the transformative power of culture in shaping our environment․ Their preservation ensures that these cultural treasures remain vibrant and meaningful in a changing world․

3․2 Organic Cultural Landscapes

Organic cultural landscapes are those that have evolved naturally over time through the interaction of human communities with their environment․ These landscapes are not intentionally designed but have developed gradually, reflecting the cultural, social, and economic practices of the people who inhabit them․ They often include traditional agricultural systems, settlements, and natural features that have been shaped by long-standing human activities․ Organic cultural landscapes are dynamic, as they continue to evolve alongside the communities that depend on them․ They hold significant cultural and historical value, offering insights into the traditions, beliefs, and ways of life of past and present societies․ UNESCO recognizes these landscapes as living examples of cultural heritage, emphasizing their importance in preserving cultural diversity and promoting sustainable development․ Protecting organic cultural landscapes requires balancing conservation with the needs of local communities, ensuring their continued vitality and relevance in a changing world․ These landscapes are a testament to the enduring relationship between humans and their environment․

3․3 Associative Cultural Landscapes

Associative cultural landscapes are deeply tied to the cultural, spiritual, or religious beliefs of a community․ These landscapes are not necessarily shaped by human intervention but are instead defined by their symbolic or intangible associations․ They often encompass natural or pre-existing features, such as mountains, forests, or water bodies, which hold profound cultural or spiritual significance․ For example, sacred sites, pilgrimage routes, or mythical landscapes fall into this category․ These landscapes are integral to the identity and heritage of the communities that value them, often reflecting shared histories, legends, or religious narratives․ UNESCO recognizes the importance of these landscapes in preserving cultural memory and fostering a sense of belonging․ The conservation of associative cultural landscapes requires careful consideration of their intangible values, ensuring that their cultural and spiritual essence is protected alongside their physical attributes․ These landscapes serve as a bridge between the natural and cultural realms, highlighting the enduring connection between people and their environment․

Notable Examples of Cultural Landscapes

Cultural landscapes like the Kenozerye Reserved Cultural Landscape exemplify the harmonious blend of natural and cultural elements․ Recognized by UNESCO, these sites highlight human interaction with the environment, preserving history and cultural identity for future generations․

4․1 The Kenozerye Reserved Cultural Landscape

The Kenozerye Reserved Cultural Landscape, located in the Arkhangelsk region of Russia, is a remarkable example of a cultural landscape․ It is situated within the Kenozersky National Park and is renowned for its well-preserved natural and cultural heritage․ This landscape reflects the traditional way of life of the local communities, showcasing their spiritual and historical connection to the land․ The site includes ancient churches, wooden villages, and traditional agricultural practices, which demonstrate the harmonious interaction between humans and nature over centuries․

Designated as a UNESCO World Heritage site, the Kenozerye Reserved Cultural Landscape is recognized for its outstanding universal value․ It exemplifies an associative cultural landscape, where natural features are deeply intertwined with cultural and religious symbolism․ The landscape also highlights the resilience of traditional practices in the face of modernization, making it a vital resource for understanding cultural and environmental sustainability․

Efforts to manage and conserve this landscape focus on preserving its integrity while promoting sustainable development; Challenges include balancing tourism with conservation and ensuring the involvement of local communities in decision-making processes․ The Kenozerye Reserved Cultural Landscape stands as a testament to the rich cultural and natural diversity of the region․

Challenges in Managing Cultural Landscapes

Managing cultural landscapes involves balancing preservation with sustainable development, addressing climate change, and ensuring community participation․ Challenges include maintaining landscape integrity while accommodating tourism and protecting sites from environmental degradation and human impact․

5․1 Management Issues and Strategies

Effective management of cultural landscapes requires addressing issues like over-tourism, environmental degradation, and resource exploitation․ Strategies include implementing sustainable tourism practices, engaging local communities, and integrating traditional knowledge with modern conservation techniques․ Monitoring systems and adaptive management plans are essential to ensure long-term preservation while fostering cultural and ecological resilience․

Recent Developments and Future Trends

Recent developments in cultural landscapes emphasize the integration of digital tools and community engagement to enhance conservation efforts․ UNESCO has launched initiatives to use digital platforms for awareness and education, such as virtual tours and peace education programs․ Additionally, there is a growing focus on recognizing indigenous cultural landscapes, as seen in the inscription of sites like the Budj Bim Cultural Landscape in Australia․ Future trends include the use of climate resilience strategies to protect these landscapes from environmental challenges․ There is also a shift toward participatory management, involving local communities in decision-making processes to ensure sustainable preservation․ Advances in technology, such as geospatial mapping, are expected to play a key role in monitoring and managing cultural landscapes effectively․ These developments highlight the evolving nature of cultural landscape conservation, blending tradition with innovation to safeguard heritage for future generations․

PDF

sun wind and light pdf

The book Sun, Wind, and Light: Architectural Design Strategies explores how architects can design buildings that efficiently use natural elements like solar radiation, wind patterns, and daylight. This comprehensive guide provides practical strategies for creating sustainable, energy-efficient spaces by harnessing these renewable resources, making it an essential resource for architects and designers aiming to integrate environmental principles into their work. Available in PDF format, it offers a detailed framework for incorporating passive solar heating, natural cooling, and daylighting techniques into modern architectural projects.

Solar Radiation

Solar radiation is a key element in architectural design, providing natural heating and lighting. The book explains how to harness sunlight effectively, ensuring energy efficiency while minimizing environmental impact through innovative design strategies.

Principles of Solar Radiation

Solar radiation is the energy emitted by the sun, primarily in the form of electromagnetic waves. It is composed of ultraviolet, visible, and infrared rays, with visible light being the most significant for human needs. The principles of solar radiation in architecture focus on understanding its intensity, distribution, and seasonal variations. Architects must consider the sun’s angle, which changes with the time of day and year, to optimize building orientation and design. Solar radiation can be categorized into beam radiation (direct sunlight) and diffuse radiation (scattered by the atmosphere). The balance between these types is crucial for natural lighting and heating strategies. Additionally, the Earth’s surface reflects and absorbs solar radiation, influencing local microclimates. By analyzing these principles, architects can design buildings that maximize energy efficiency and comfort while minimizing environmental impact. The book provides detailed methods for calculating solar radiation availability and applying it to various architectural contexts.

Applications of Solar Radiation in Architecture

Solar radiation plays a pivotal role in architectural design, offering numerous applications that enhance energy efficiency and sustainability. One of the most significant applications is passive solar heating, where buildings are designed to capture and store solar energy during the day for nighttime use. This is achieved through large south-facing windows, thermal mass materials, and insulation. Solar radiation also powers photovoltaic systems, converting sunlight into electricity for buildings. Additionally, daylighting strategies leverage natural light to reduce the need for artificial lighting, improving occupant comfort and energy savings. Architects also use shading devices, such as overhangs and louvers, to control solar radiation, preventing overheating in summer while allowing sunlight in during winter. These applications not only reduce reliance on mechanical systems but also create healthier, more sustainable indoor environments. By integrating solar radiation principles, architects can design buildings that are both functional and environmentally responsive, aligning with modern sustainability goals.

Wind Patterns

Wind patterns involve the movement of air masses and their interaction with solar radiation. High-speed solar winds impact Earth’s magnetic field, influencing climate and weather. Understanding these patterns is crucial for architectural strategies that utilize natural ventilation and renewable energy sources.

Understanding Wind Patterns

Wind patterns are shaped by temperature differences, atmospheric pressure, and Earth’s rotation. Solar radiation heats the ground unevenly, causing air to rise and create areas of low pressure, which pull in cooler air. This movement of air masses drives wind currents. On a global scale, trade winds and westerlies distribute heat across latitudes, while locally, topography and vegetation influence wind direction and speed. Architects study these patterns to design buildings that maximize natural ventilation, reducing the need for mechanical cooling. For instance, tall structures can disrupt airflow, while strategically placed openings enhance airflow. Understanding wind patterns also aids in positioning wind turbines and solar panels for optimal energy generation. By integrating these insights, architects can create energy-efficient, climate-responsive designs that align with sustainability goals.

Wind Applications in Architectural Design

Wind plays a crucial role in architectural design, particularly in enhancing natural ventilation and reducing reliance on mechanical systems. By analyzing wind patterns, architects can design buildings that maximize airflow, improving thermal comfort and energy efficiency. Strategies include orienting buildings to capture prevailing winds, incorporating large openings, and using design elements like wing walls or overhangs to direct airflow. Natural ventilation not only cools spaces but also reduces energy consumption. Wind-driven design also influences the placement of windows, balconies, and outdoor spaces to optimize airflow and occupant comfort. Additionally, wind energy can be harnessed through turbines integrated into building design, providing a renewable power source. Understanding wind behavior enables architects to create sustainable, climate-responsive buildings that align with environmental and energy-efficient goals, enhancing both functionality and aesthetics. These principles are detailed in resources like Sun, Wind, and Light: Architectural Design Strategies, offering practical insights for modern architectural practices.

Daylighting Design

Daylighting design harnesses natural light to enhance interior spaces, reducing the need for artificial lighting and improving energy efficiency. Strategic placement of windows, skylights, and reflective surfaces optimizes light distribution, creating brighter, more sustainable environments while minimizing energy consumption.

Principles of Daylighting

The principles of daylighting are centered around maximizing natural light in buildings to reduce reliance on artificial lighting. This involves strategic placement of windows, skylights, and clerestory windows to capture and distribute sunlight effectively. Key considerations include the orientation of building facades, the use of reflective surfaces to redirect light, and the integration of shading devices to control glare and heat gain. Proper daylighting design not only enhances visual comfort but also contributes to energy efficiency by lowering the need for electric lighting during the day. Additionally, it improves occupant well-being by providing exposure to natural light, which has been shown to boost productivity and mood. By understanding and applying these principles, architects can create spaces that are both sustainable and aesthetically pleasing, ensuring optimal use of natural light throughout the day.

Daylighting Applications in Buildings

Daylighting applications in buildings focus on utilizing natural light to enhance interior spaces while reducing energy consumption. This approach is widely used in residential, commercial, and educational buildings to create brighter, more inviting environments. Key strategies include the installation of skylights, larger windows, and clerestory windows to maximize light penetration. Reflective surfaces and light shelves are also employed to distribute sunlight evenly, minimizing glare and hotspots. Daylighting not only improves visual comfort but also supports sustainability by lowering the need for artificial lighting. Buildings incorporating these techniques often report reduced energy costs and improved occupant satisfaction. For instance, schools and offices with ample natural light have shown enhanced productivity and well-being among users. Additionally, daylighting aligns with green building standards, making it a cornerstone of modern architectural design aimed at environmental harmony and energy efficiency. Its applications are vast, offering both functional and aesthetic benefits for diverse building types.

Impact on Sustainability

Design strategies leveraging sun, wind, and light significantly reduce energy consumption and carbon emissions. By integrating natural elements, buildings achieve energy efficiency, lower operational costs, and contribute to a healthier environment, promoting sustainable development and eco-friendly practices.

Energy Efficiency and Environmental Benefits

Designing buildings that utilize sun, wind, and light significantly enhances energy efficiency and reduces environmental impact. By harnessing solar radiation for heating and wind patterns for cooling, architects can minimize reliance on non-renewable energy sources, lowering carbon emissions and operational costs. Daylighting strategies further reduce the need for artificial lighting, cutting energy consumption and promoting natural illumination. These approaches not only conserve resources but also contribute to a healthier environment by reducing greenhouse gas emissions. The integration of renewable energy sources, such as solar wind, into building design supports sustainable development and aligns with global efforts to combat climate change. Additionally, these strategies improve indoor air quality and occupant comfort, creating spaces that are both eco-friendly and conducive to well-being. By prioritizing energy efficiency and environmental benefits, architects can create buildings that are not only functional but also harmonious with nature, setting a benchmark for sustainable design practices.

Resources and Further Reading

For those seeking to explore the concepts of sun, wind, and light in architectural design, several resources are available. The book Sun, Wind, and Light: Architectural Design Strategies by G.Z. Brown is a comprehensive guide offering detailed insights into harnessing natural elements for sustainable building design. Available in PDF format, it provides practical strategies and case studies for architects and designers. Additionally, online platforms like LitRes offer e-book versions for convenient access. Other resources include academic papers and articles discussing solar radiation, wind patterns, and daylighting techniques. Websites such as sun-worth.gmc.globalmarket.com provide information on solar and wind-powered products, while forums and communities dedicated to sustainable architecture share real-world applications and innovations. These resources collectively offer a wealth of knowledge for professionals and enthusiasts alike, fostering a deeper understanding of environmental design principles and their practical implementation in modern architecture.

United Kingdom

zanussi washing machine manual pdf

Welcome to the Zanussi Washing Machine Manual, your comprehensive guide to installing, operating, and maintaining your appliance. This manual ensures optimal performance and safety for years to come.

Understanding the Importance of the User Manual

The Zanussi washing machine manual is an essential resource for safe and efficient appliance operation. It provides detailed instructions for installation, usage, and maintenance, ensuring optimal performance and longevity. By following the manual, users can avoid potential risks, such as damage to clothing or the machine itself. The guide also includes troubleshooting tips and error code explanations, helping you resolve issues quickly. Additionally, the manual highlights energy-saving features and wash cycles, allowing you to make eco-friendly choices. Reading and adhering to the manual ensures compliance with warranty conditions and enhances your overall user experience. It’s a vital tool for maximizing your washing machine’s potential and ensuring safety for years to come.

Overview of the Manual’s Content and Structure

The Zanussi washing machine manual is organized into clear sections, ensuring easy navigation. It begins with safety precautions and installation guidelines, followed by detailed operating instructions. The manual outlines various wash cycles and fabric care tips, helping users optimize cleaning results. Maintenance routines, such as cleaning filters and checking for rust, are also covered. Troubleshooting sections address common issues, while error codes provide quick solutions. Additionally, the manual includes a parts list and warranty information. The PDF format allows for easy downloading and referencing. This structured approach ensures users can quickly find the information they need, making it an indispensable guide for both new and experienced users;

Safety Information and Precautions

Always follow safety guidelines to prevent accidents. Avoid overloading and washing prohibited items like whalebones or torn fabrics. Refer to the manual for specific warnings and precautions.

General Safety Guidelines for Installation and Use

Ensure the installation site is flat, stable, and clean before placing the washing machine. Remove all transit bolts and packaging carefully. Keep the transit bolts safe for future use; Avoid overloading the machine and never wash items with whalebones, torn fabrics, or greasy substances, as they may damage the appliance. Always follow the instructions on garment labels and the manufacturer’s guidelines for detergent use. Pre-wash heavily soiled items separately to prevent damage to the machine’s rubber parts. Never operate the washing machine without ensuring all pockets are empty and zippers are closed. Adhere to these guidelines to ensure safe and efficient operation.

Specific Safety Instructions for Washing Machine Operation

Always follow the specific safety instructions for operating your Zanussi washing machine. Before starting a cycle, ensure all pockets are emptied and zippers are closed to prevent damage. Never wash items with whalebones, torn fabrics, or materials that are not designed for machine washing. Avoid overloading the machine, as this can cause imbalance and poor washing performance. Use only recommended detergents and follow the instructions on the packaging. After the cycle, immediately unload the machine to prevent creasing and musty odors. Regularly clean the detergent dispenser and gasket to maintain hygiene. Keep children away from the machine during operation and ensure the lid is closed properly to avoid accidents.

Installation and Setup

Prepare the site by ensuring a flat, stable, and clean floor. Remove all packaging and transit bolts, keeping them safe for future reinstallation needs. Level the machine carefully.

Preparing the Site for Washing Machine Installation

Before installing your Zanussi washing machine, ensure the site is flat, stable, and clean to prevent vibrations. The floor must be heat-resistant and even to avoid imbalance. Clear the area of any obstructions. Check that the site is level to ensure proper drainage and machine stability; Verify that water supply lines and electrical connections are within easy reach. Keep transit bolts handy for future use. Proper preparation ensures smooth installation and optimal performance. Always follow manufacturer guidelines for a safe and correct setup.

Removing Transit Bolts and Packaging

Before installing your Zanussi washing machine, remove all transit bolts and packaging materials to ensure safe and proper operation. Carefully take out the bolts from the rear of the machine to prevent damage during transportation. Keep the bolts in a safe place for future use if you need to move the appliance again. Also, remove any protective covering or packaging from the exterior and interior of the machine. Failure to remove transit bolts can cause noise and vibration issues during operation. Always double-check that all packaging materials are removed to avoid damage to the machine or surrounding areas.

Operating the Washing Machine

Operate your Zanussi washing machine by selecting the appropriate cycle and options via the control panel. Always follow garment label instructions and avoid overloading the machine for optimal performance.

Understanding the Control Panel and Wash Cycles

The control panel simplifies operation with intuitive buttons and a display showing cycle progress. Select from various wash cycles like delicate, normal, or heavy-duty, each optimized for specific fabric types. Additionally, options such as temperature adjustment and spin speed allow customization to meet your laundry needs. Refer to the manual for a detailed explanation of each cycle and option to ensure you’re using the machine effectively. Proper use of these features enhances cleaning results and protects your garments from damage, making the Zanussi washing machine a versatile and efficient appliance for all your laundry requirements.

Following Garment Label Instructions for Optimal Washing

Always check and follow the care labels on your garments to ensure optimal washing results. Garment labels provide specific instructions for temperature, cycle type, and special care requirements. Ignoring these guidelines can damage fabrics or result in poor cleaning outcomes. Use the appropriate wash cycle and settings on your Zanussi washing machine, such as delicate or heavy-duty, based on the label instructions. Pre-treat stains and avoid washing items with metal parts or loose buttons that could cause damage. For delicate items like lingerie or woolens, select the gentle cycle with cold water. Adhering to these guidelines will help maintain the quality of your clothes and extend their lifespan.

Maintenance and Care

Regular cleaning of the detergent drawer and gasket helps prevent mold and odors. Use rust-removal products as directed to maintain performance and extend appliance lifespan.

Regular Cleaning and Maintenance Tips

Regular cleaning and maintenance are essential to ensure your Zanussi washing machine operates efficiently. Start by cleaning the detergent drawer regularly to prevent residue buildup. Check and clean the filter monthly to remove debris and lint. Leave the washing machine door open after use to allow moisture to evaporate, reducing mold and odors. Run a cleaning cycle with a washing machine cleaner every 1-2 months. For rust prevention, use specialized products as directed. Avoid overloading the machine, as this can strain internal components. Regularly inspect hoses and connections for signs of wear or leaks. These simple steps will extend the lifespan of your appliance and maintain optimal performance.

Dealing with Rust and Grease in the Washing Machine

Rust and grease buildup can damage your Zanussi washing machine over time. To address this, use specialized cleaning products designed for washing machines. Run a cleaning cycle with the recommended product to remove rust particles and grease. Always follow the instructions on the product packaging. For severe rust, repeat the process until the interior is clean. Regularly cleaning the detergent drawer and gasket can also prevent grease accumulation. After cleaning, leave the door open to dry thoroughly. Addressing rust and grease promptly ensures optimal performance and extends the lifespan of your appliance; Regular maintenance is key to preventing these issues from recurring.

Troubleshooting Common Issues

Common issues with your Zanussi washing machine, such as error codes or operational problems, can often be resolved by checking the manual or troubleshooting guide provided.

Identifying and Resolving Error Codes

Your Zanussi washing machine manual provides a detailed list of error codes and their meanings. Each code indicates a specific issue, such as problems with water supply, drainage, or sensor malfunctions. To resolve these issues, refer to the troubleshooting section of the manual, which offers step-by-step solutions. For example, error codes like “E10” or “E20” often relate to water inlet or drainage problems. Always check the manual or Zanussi’s official website for accurate interpretations and repair guidance. Regular maintenance, such as cleaning filters, can prevent many of these issues. If unresolved, contact a certified technician for professional assistance. Ensure safety by unplugging the machine before attempting repairs.

Addressing Common Operational Problems

Common issues with your Zanussi washing machine, such as vibrations, noise, or improper washing, can often be resolved with simple adjustments. Ensure the machine is levelled correctly to prevent imbalance during operation. If the machine does not start, check the power supply and ensure the door is closed properly. For issues like poor washing performance, verify detergent dosage and wash cycle selection. Refer to the manual for guidance on resetting the machine or running a cleaning cycle. If problems persist, consult the troubleshooting section or contact Zanussi support for assistance. Regular maintenance, such as cleaning filters, can also help prevent operational issues. Always follow the manual’s instructions for optimal results.

Downloading the Zanussi Washing Machine Manual

To download the Zanussi Washing Machine Manual, visit the official Zanussi website. Use the model number to search and download the PDF. Utilize the troubleshooter for assistance.

Steps to Find and Download the PDF Manual

To find and download the Zanussi Washing Machine Manual PDF, visit the official Zanussi website. Navigate to the “Support” or “Downloads” section. Enter your washing machine’s model number in the search bar. Select your appliance from the results and click on the “Manual” or “Download” option. The PDF manual will be available for download. Ensure you select the correct model to access accurate information. For assistance, use the website’s troubleshooter or contact customer support if needed. Always verify the source to ensure the manual is genuine and up-to-date for your specific appliance.

Using the Manual for Troubleshooting and Maintenance

The Zanussi Washing Machine Manual PDF is an essential resource for troubleshooting and maintenance. It provides detailed error code explanations, helping you identify and resolve issues quickly. Maintenance sections guide you on cleaning filters, checking for rust, and ensuring optimal performance. Refer to the manual for step-by-step instructions on routine care, ensuring your appliance lasts longer and operates efficiently. Additionally, specific instructions on handling rust and grease are included, along with tips for regular cleaning. By following the manual, you can prevent common problems and maintain your washing machine in excellent condition, ensuring reliable service for years to come.

Manuals

instruction manual for kenmore sewing machine model 385

Unboxing and Initial Setup

Carefully unpack the Kenmore 385 sewing machine from its box, ensuring all components are included and undamaged. Place the machine on a stable, flat surface. Plug in the power cord and prepare for initial use by referring to the manual for setup guidance.

1.1. Checking the Contents of the Package

Upon unboxing, verify the Kenmore 385 sewing machine package contains the main unit, power cord, sewing pedal, bobbins, needles, and an instruction manual. Ensure all accessories are included and inspect for any visible damage. If any items are missing or damaged, contact customer support immediately for assistance. Properly organizing these components will ensure a smooth setup process.

1.2. Placing the Machine on a Stable Work Surface

Position the Kenmore 385 sewing machine on a sturdy, flat work surface, such as a sewing table or desk. Ensure the area is clear of clutter and distractions. Gently place the machine down to avoid damaging the internal components. The surface should be level to maintain proper balance and prevent vibration during operation; Plug in the power cord, ensuring it is securely connected to both the machine and a nearby outlet.

Identifying Parts of the Kenmore 385 Sewing Machine

Familiarize yourself with key components like spool pins, bobbin winder, tension dials, handwheel, and power cord. These parts are essential for proper machine operation and maintenance.

2.1. Locating the Spool Pins, Bobbin Winder, and Tension Dials

Locate the spool pins on the top of the machine for threading. The bobbin winder is typically on the side, near the handwheel. Tension dials are usually on the front or side, controlling thread tightness. These components are essential for proper setup and operation.

2.2. Understanding the Function of the Handwheel and Power Cord

The handwheel, located on the right side, controls the needle’s up-and-down movement. Turning it manually raises or lowers the needle, helpful for starting or ending stitching. The power cord connects the machine to an electrical outlet, enabling motorized operation. Always ensure the cord is securely plugged in and avoid overloading the circuit for safe and efficient sewing.

Threading the Sewing Machine

Threading is essential for proper machine operation. Guide the upper thread through the tension discs and take-up lever, then insert into the needle. Refer to the manual for detailed steps.

3.1. Step-by-Step Guide to Threading the Upper Thread

Insert the thread into the tension disc, located at the top of the machine. Ensure it clicks securely.
Loop the thread around the take-up lever, moving it from right to left.
Guide the thread through the needle bar and insert it into the sewing machine’s needle from front to back.
Gently pull the thread to remove any slack, ensuring proper tension. Always refer to the manual for precise alignment and tension adjustment.

3.2. Properly Threading the Bobbin

Place the bobbin on the machine’s bobbin winder, ensuring it aligns correctly.
Insert the thread through the bobbin’s hole and wind it evenly, stopping when full.
Cut the excess thread and insert the bobbin into the bobbin case.
Gently pull the thread to ensure it’s seated properly in the machine. Always maintain the correct tension for smooth stitching.

Winding the Bobbin

Place the bobbin on the winder, thread it through the guide, and wind evenly until full. Stop, cut excess thread, and ensure proper tension for smooth operation. Refer to the manual for specific diagrams and adjustments.

4.1. Preparing the Bobbin for Winding

Insert the bobbin into its holder, ensuring it is securely seated. Align the bobbin notch with the spindle. Gently pull the thread to remove any slack and cut excess. Ensure the bobbin is empty or has the correct thread type before winding. Refer to the manual for specific diagrams to confirm proper preparation. This step ensures smooth winding and prevents tangles or uneven thread distribution.

4.2. Correctly Winding the Bobbin with Thread

Place the thread on the spool pin and guide it through the bobbin tension guide. Turn the handwheel gently to start winding. Stop halfway to cut excess thread, then continue winding until the bobbin is 2/3 full. Avoid overfilling. Remove the bobbin and trim the thread end. Ensure the thread is evenly distributed for smooth sewing performance. Always refer to the manual for precise winding techniques.

Selecting and Sewing with Different Stitches

The Kenmore 385 offers various stitch options, including straight, zigzag, and decorative stitches. Use the stitch selector dial to choose the desired stitch for your fabric type. Adjust stitch length and width as needed for optimal results. Always test stitches on scrap fabric before sewing your final project.

5.1. Overview of Available Stitch Options

The Kenmore 385 sewing machine features a variety of built-in stitches, including straight stitch, zigzag, and decorative options. These stitches cater to different sewing needs, from basic repairs to intricate designs. The machine also allows for customization, enabling users to adjust stitch length and width for optimal fabric compatibility. This versatility makes it suitable for both beginners and experienced sewers, ensuring precise and professional results.

5.2. Adjusting Stitch Length and Width

To customize your sewing experience, adjust the stitch length and width using the designated dials on the Kenmore 385. The stitch length dial controls the distance between stitches, while the width dial sets the stitch’s breadth. Turn the dials clockwise or counterclockwise to achieve the desired settings; Always test the adjustments on scrap fabric before sewing your final project to ensure optimal results for various fabrics and stitch types.

Maintenance and Cleaning

Regularly clean the machine by removing dust and lint from the bobbin area and tension discs. Oil the machine as instructed to ensure smooth operation and longevity.

6.1. Regular Cleaning of the Machine

Turn off and unplug the Kenmore 385 sewing machine. Use a soft brush or cloth to remove lint and debris from the bobbin area, tension discs, and stitch plate. Avoid using harsh chemicals or abrasive materials that could damage the finish. Regular cleaning ensures optimal performance and prevents thread breakage or mechanical issues. Refer to the manual for detailed steps and safety precautions.

6.2. Oiling the Machine for Smooth Operation

Regularly oil the Kenmore 385 sewing machine to maintain smooth operation. Apply a few drops of sewing machine oil to the hook area, bobbin race, and other moving parts. Gently turn the handwheel to distribute the oil evenly. Avoid over-oiling, as excess oil can attract lint and dust. Use high-quality sewing machine oil for optimal performance. Refer to the manual for specific oiling points and frequency recommendations.

Troubleshooting Common Issues

Identify common issues like thread breakage, tension problems, or faulty bobbin and needle. Check and adjust these components as needed to restore smooth operation.

7.1. Resolving Thread Breakage and Tension Problems

Thread breakage often occurs due to improper threading or incorrect tension settings. Check the thread path and ensure the spool pin and bobbin are correctly aligned. Adjust the tension dials to achieve balanced stitch formation. If issues persist, consult the manual for guidance on resetting tension or rethreading the machine properly.

7.2. Fixing Issues with the Bobbin or Needle

If the bobbin is not seated correctly, remove it and ensure it is properly aligned before reinserting. For needle issues, check if it is bent or damaged and replace it with a new one. Always refer to the manual for specific instructions on replacing parts. Proper alignment and correct installation are crucial for smooth operation and consistent stitching quality.

Advanced Features and Accessories

Explore advanced features like specialized presser feet and custom stitching options. Accessories include additional needles, bobbin cases, and custom presser feet for enhanced sewing capabilities and versatility.

8.1. Using Optional Presser Feet for Specialized Sewing

Optional presser feet enhance sewing versatility. Use the zipper foot for precise zipper installation, the zigzag foot for decorative stitching, and the blind hem foot for invisible hems. Attach the desired foot by snapping it onto the machine’s presser foot holder, ensuring it clicks securely. Consult the manual for specific attachment guidance and recommended uses for each foot type to achieve professional results in various sewing projects.

8.2. Attaching and Detaching the Sewing Machine Pedal

Attach the pedal by aligning its connector with the machine’s pedal port and gently pushing until it clicks. To detach, press the release button on the pedal cord and pull it away from the machine. Store the pedal in a safe, dry place when not in use to prevent damage or tripping hazards. Always ensure the pedal is securely connected for smooth operation.

Safety Precautions and Warranty Information

Adhere to all safety guidelines to avoid accidents. Keep loose clothing tied back and avoid sewing flammable materials. Refer to the warranty section for coverage details and registration instructions.

9.1. Important Safety Guidelines for Operation

Always read the manual before first use. Keep children and pets away while operating the machine. Tie back loose clothing and long hair. Avoid sewing flammable materials. Ensure the machine is placed on a stable, flat surface. Unplug when not in use. Refer to the warranty section for coverage details and maintenance tips.

9.2. Understanding the Warranty Coverage

The Kenmore 385 sewing machine warranty covers parts and labor for a specified period, typically excluding normal wear items like needles and belts. Warranty validity requires proper machine maintenance. For detailed terms, refer to the manual or manufacturer’s website. Keep the purchase receipt as proof of ownership. Warranty repairs must be performed by authorized service centers to maintain coverage.

Mastering the Kenmore 385 sewing machine requires practice and patience. Regular maintenance, proper threading, and exploring stitch options will enhance your sewing experience. Happy sewing!

10.1. Best Practices for Long-Term Machine Performance

Regularly clean and oil the machine to maintain smooth operation. Always use high-quality threads and needles. Store the machine in a dry, cool place. Properly thread and tension the machine before sewing. Avoid overloading the machine with thick fabrics. Refer to the manual for specific care instructions to ensure optimal performance and extend the machine’s lifespan.

10.2. Resources for Further Assistance and Support

For additional help, visit the official Kenmore website or Sears PartsDirect for genuine accessories. Consult online forums and sewing communities for troubleshooting tips. Contact Kenmore customer support for professional assistance. Refer to the manual or download updated guides from trusted sources. Utilize local sewing shops or authorized service centers for hands-on guidance and repairs, ensuring your machine remains in optimal condition.